How to Replace a Cabin Air Filter
- Arthur Rodriquez
- 0
- Posted on

Replacing the cabin air filter is a crucial maintenance task that enhances the air quality inside your vehicle. Over time, the filter becomes clogged with dust, pollen, and other contaminants, which can impair the efficiency of your car’s HVAC system. Regular replacement ensures that you and your passengers breathe cleaner air while driving.
In this guide, we will provide you with detailed step-by-step instructions to assist you in replacing your cabin air filter effectively. Whether you are a seasoned DIY enthusiast or a beginner, these straightforward steps will help you complete the replacement with confidence.
Knowing how to replace the cabin air filter not only contributes to a more pleasant driving experience but also promotes the longevity of your vehicle’s ventilation system. Let’s dive into the necessary steps for a successful cabin air filter replacement.
Identifying the Correct Cabin Air Filter for Your Vehicle

To ensure optimal airflow and air quality inside your vehicle, it’s crucial to identify the correct cabin air filter for replacement. Start by consulting your vehicle’s owner manual, as it typically lists the specific filter required, including dimensions and filter type.
Next, check for any OEM (Original Equipment Manufacturer) part numbers printed on the existing filter. These numbers can be cross-referenced online or at automotive stores to find the compatible replacement. If the filter is not easily accessible, consider removing it carefully to examine its size and configuration.
Additionally, research the recommended brands and filter types, such as activated charcoal or high-efficiency particulate filters, which may enhance air quality more effectively than standard options. Lastly, verify compatibility through reliable automotive databases or authorized retailers to prevent purchasing the incorrect cabin air filter for your vehicle.
Tools Needed and Safety Precautions for Replacement

Before beginning the cabin air filter replacement process, it is essential to gather the necessary tools to ensure a smooth and efficient task. You will need a screwdriver, typically Phillips or flat-head, depending on your vehicle model. Some cars require a ratchet set for removing specific components that obstruct access to the filter. Additionally, having a flashlight can help illuminate dark areas, making the replacement easier.
While replacing the cabin air filter is a straightforward task, observing safety precautions is crucial. First, ensure that the vehicle is parked on a level surface and the engine is turned off. Disconnect the negative battery terminal to prevent any electrical issues, especially if you will be working near the vehicle’s electrical components. Always wear gloves to protect your hands from dirt and contaminants found in the cabin area.
It is advisable to work in a well-ventilated space to avoid inhaling dust and allergens released during the replacement process. If your vehicle has sharp edges or moving parts near the filter location, be cautious and avoid any contact that might cause injury. Lastly, consult your vehicle’s owner manual for specific instructions and for any unique safety measures related to cabin filter replacement.
Detailed Steps for Removing and Installing the Cabin Air Filter
Start by ensuring that the vehicle is parked on a level surface and the engine is turned off. Open the hood to access the cabin air filter compartment.
Locate the cabin air filter housing, which is typically found behind the glove box or under the dashboard. Consult the vehicle’s manual if you’re unsure of its location.
Remove any screws or clips securing the glove box or panel covering the cabin air filter. Carefully detach the glove box, ensuring not to damage any connecting wiring.
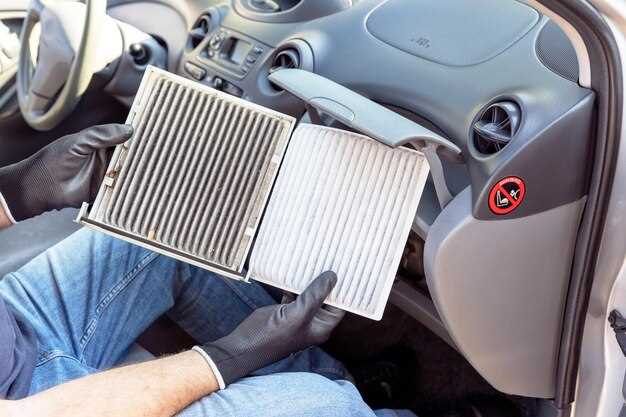
With the glove box removed, you will see the cabin air filter housing. Gently unclip or unscrew the housing cover to expose the filter. Take note of the orientation of the old filter, as this will guide the correct installation of the new one.
Carefully pull out the old cabin air filter. It may have accumulated debris and dust, so handle it with care to avoid a mess.
Before installing the new filter, check the housing for any dirt or obstructions and clean it if necessary. Position the new filter in the same orientation as the old one, ensuring it fits snugly into the housing.
Reattach the housing cover securely, making sure it is properly sealed to prevent any contaminants from entering the cabin.
Reinstall the glove box or panel, securing it with screws or clips. Ensure that all fasteners are tight but avoid overtightening.
Once the glove box is back in place, close the hood and start the vehicle. Test the climate control system to ensure proper airflow, confirming that the cabin air filter replacement was successful.